Bomb-Proof Modular Shelving System
22 Sunday Jan 2012
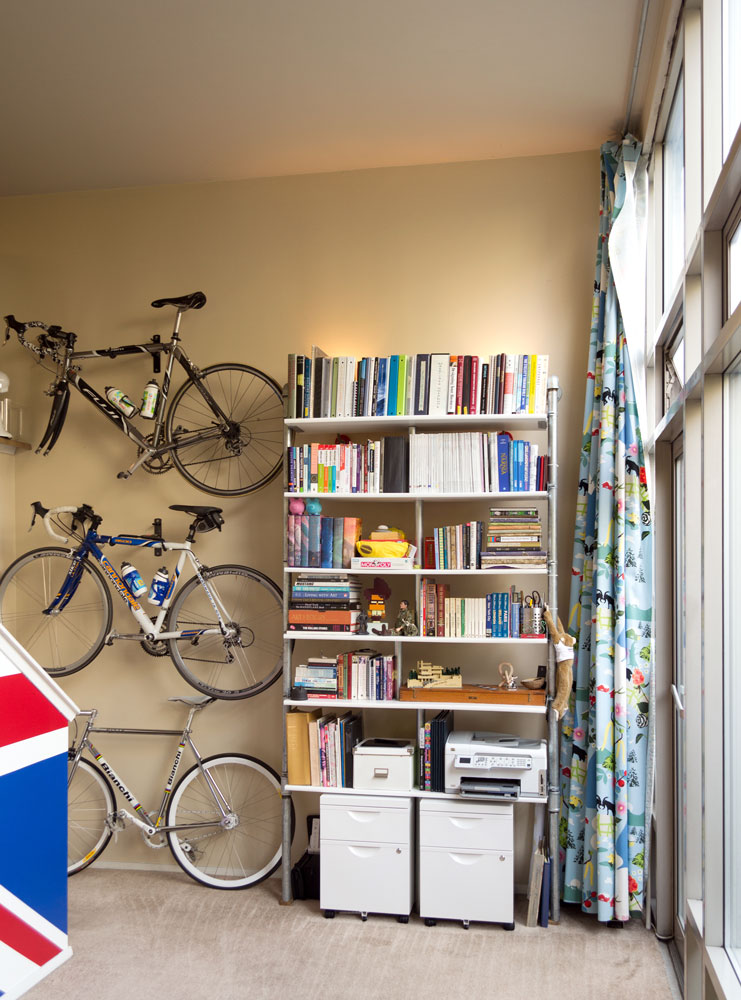
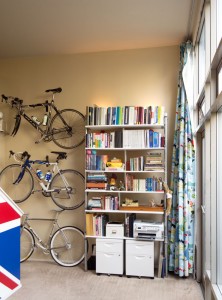 The inaugural project to feature on Everyday Modern came to me whilst shopping for my first studio apartment in the big city. Driving across the emptiness that comprises central Washington between Spokane and Seattle, I obsessed about finding a way to not only house my ridiculously over-sized collection of books in a 500 square foot apartment (that also needed to serve as a home for two humans and two greyhounds), but also create a sense of division within a one room dwelling.
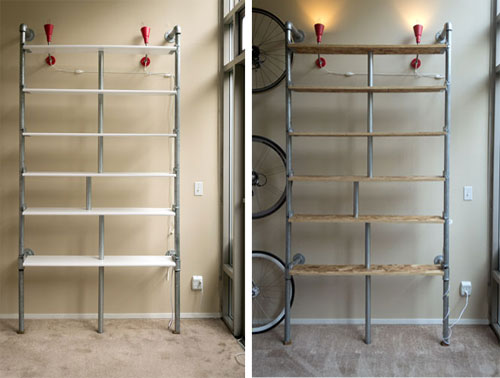
After countless hours and sleepless nights, I had mentally woven together plumbing pipes, fencing parts, and OSB to create a Bomb-Proof Modular Shelving System. This shelving system would house all of my books, and grow with us; leaving just that one other thing that I needed to do — build it.
Since I first constructed this shelving system over three years ago, I have had a couple of different versions residing in my apartment. This post will focus on the Wall Anchor construction (using OSB shelves or melamine shelves), to see the Ceiling Anchor construction, kindly visit this other post.
Your first order of business will be to get the stuff, all of which you can find at your local Home Depot (and no, to date, I haven’t received an endorsement…).
Tool Belt:
- A Buddy
- Screw Gun
- Crescent Wrench (and one for your friend)
- Hammer
- Level
- Skil Saw
- Clamps
- Hack Saw with a blade to cut pipe
- Foam Sanding Block (to sand down any rough edges on the OSB, not needed for Melamine)
Required Available Funds:
- 6 Shelf Wall Anchor (melamine): $269.84
- 6 Shelf Wall Anchor (osb): $237.70
Shopping List:
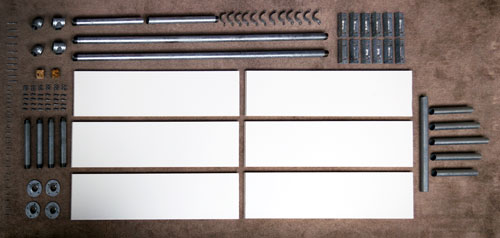
- 2 1 ¼“x10’ Galvanized Plumbing Pipes (have these cut and rethreaded so you have two pieces that are about 20″ and two pieces that are 100″ – but, if you have standard 8′ ceilings, you should have the longer pieces cut and rethreaded to be 74″)
- 1–2 1 5/8“x8’ Aluminum Fence Post
- 4 1 ¼” Galvanized Plumbing Flanges
- 2 1 ¼” Galvanized Plumbing T-junctions
- 2 1 ¼” Galvanized Plumbing 90 degree elbows
- 4 1 ¼” Galvanized Plumbing Nipples (If you want your shelves closer to the wall, use 8″-10″ nipples)
- 12 1 ¼” Electrical Conduit Strap
- 12 Adjustable Wood Adapter Fence Clamp*
- 1 4’x8’x3/4″ OSB OR 3- 8’x11 ¼“x3/4″ Melamine Shelves (aesthetic is totally up to you – use OSB for a more industrial look, and melamine for a cleaner minimalist look)
- 1 Package Pain in the Ass Melamine Iron-on Side Stripping (not needed for OSB)
- 24 #10 Pan-head Sheet Metal Screws
- 16 Lag Screws (or some other bomb proof method of anchoring these to the wall, this will depend on what your house is built of, just make sure the screws fit through the holes in the flanges)
- 2 2“x2“x3/4″ Wooden Blocks to support the 1 1/4″ galvanized pipe**
* Can be found in the aluminum fencing section of the store
** I cut mine out of some scrap OSB – they hardly show, so they don’t have to be fancy style.
Get Down to It:
Now that you’ve acquired all of the necessary goods to produce this modern wonder of shelving excellence, it’s time to get down to business.
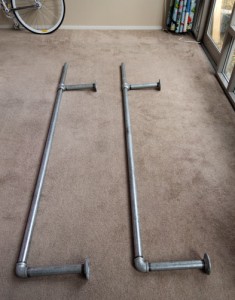
Step 1: Gather up all of the galvanized loveliness that comprises your plumbing parts. Connect the 90-degree elbows to the tops of each of the longest 1 1/4″ galvanized pipes and connect the t-junctions to the bottom. Next, grab your nipples (yeah, I went there), and connect a nipple to each of the 90-degree elbows and t-junctions (see Exhibit A), and then put a flange on the other end of each nipple. Finish up with Step 1 by connecting the 20″ 1 1/4″ pipes to the bottom of the t-junction. This all makes a lot more sense if you just take a peek at the photo.
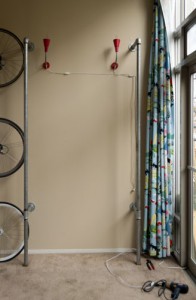
Exhibit B — these pipes are structurally mounted to the wall and can obligingly support the weight of a pole dancer
Step 2:We have now reached the point in our relationship where people get all lawsuit happy, so all I’m going to say is find a way to attach these flanges to your wall in a structurally sound way. The pipes need to be spaced apart just a hair wider than the width of your shelf. Insert legal jargon here — Everyday Modern and it’s affiliates does not assume responsibility for the injury or damage to persons or precious things because the bookshelf fell down from lack of structural ingenuity on the part of the builder. Said builder undertakes this project with full knowledge that if they fail to take responsibility for the anchor engineering, they will likely die because the bookshelf will inevitably topple over on top of them. On that cheery note, we move on to Step 3.
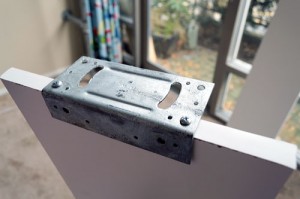
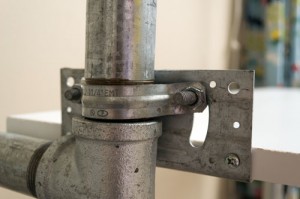
Step 3: Begin by disassembling the fence brackets. You will need only the L-shaped bracket and the nuts and bolts, (you can just throw away the C-shaped part, or save it for later creativity!). Attach the L-shaped brackets to both ends of the shelves. For your convenience, there are handy pre-fabricated holes in the brackets, so just drill the screws in and you’re cooking. When you get the brackets attached, test to make sure the shelves fit between the pipes. Once confirmed, proceed to attach all brackets to all shelves — this will make it way easier when you’re contorting yourself into downward-facing-dog to get all of them mounted on the poles.
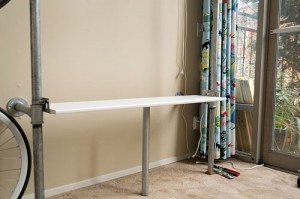
Step 4: And now the moment that we have all been bating our breath for: modular customization! Determine how high you want your first shelf, and cut a piece of fence pipe to that length. Once you’ve got your custom cut pipe, lower the first shelf into position, and center the fence pipe under the shelf for moral and structural support.
Now is the time to kindly request assistance from your anxiously waiting buddy. Politely ask them to grab one of the electrical conduit straps and a couple of the fence bracket nuts and bolts that we set aside earlier. They should bolt the clamp around the pipe and through the shelf bracket, while you perform a series of awe-inspiring pilates moves to keep the shelf level and the fence pipe plumb amidst the horribly executed wrenching from your buddy. It should look something like Exhibit E now. Be sure to keep an eye on your level, you may find it useful to gently tap the shelf into level using a hammer. Your friend should tighten the nuts on both sides of the shelf as far down as they can. You’ll notice that the conduit clamp starts to get a little disfigured, but that’s okay. After three years and five disassemblies, my conduit straps are still holding strong in their amended form.
Step 5: Repeat Step 4 until you’re finished. Make sure that you keep the fence poles as close to center as possible and this will allow the weight of the shelves to transfer to the floor and prevent ass-sag, (you’ll notice that one of the poles is slightly off center on the example photo and that is to accommodate an antique wooden box of drafting supplies that we keep on the shelf (this hasn’t really seemed to be an issue as far as structural integrity goes, but if you’re worried, just keep them all centered).
Step 6: Share this lovely project with all of your friends, for goodness sakes, you just got an awesome free how-to. Oh, and please feel free to re-publish, but give me credit for my work when you do!